How to Fix Slow Chrome Download Speed
Do you feel your Chrome downloads crawl along at a snail’s pace? Like a car stuck in a traffic jam, you can get your downloads moving again. By following this guide, you’ll be able to get your downloads back up to speed in no time. With a few simple tweaks, you can have your downloads running at their peak performance in no time, allowing you to move forward with your computing tasks. Let’s explore essential steps to fix slow Chrome download speed.
Contents
- 1 Internet Connection
- 2 Close Unused Tabs
- 3 Close Other Applications
- 4 Disable VPN
- 5 Update Chrome Version
- 6 Disconnect Other Devices
- 7 Enable Parallel Downloading
- 8 Clearing Browsing Data
- 9 Flush DNS Cache
- 10 Update DNS Servers
- 11 Disable Third-Party Extensions
- 12 Disable Hardware Acceleration
- 13 Setup a Download Manager
- 14 Conclusion
Internet Connection
If you have duplicate files, you may verify that a sluggish internet connection is not the problem by downloading them on a different device using the same internet connection. Let’s say you still get slow connectivity on your other devices. In such a situation, increasing the speed of your Wi-Fi network is crucial.

Try downloading the file again using a different web browser if the download speed is enough on other devices. If the issue remains after that, try adjusting your network settings in Windows or OS X. If you’re sure the problem is with Chrome, you may try updating the browser and switching to a wired connection.
Close Unused Tabs
To free up resources and potentially speed up your downloads on Chrome, there are several steps you can take:
- Close any tabs you’re not actively using.
- Disable any unnecessary extensions.
Once you have done that, open the Chrome browser and try to download a file. If your download speeds are still slow, follow these additional steps:

- Click the menu button (three vertical dots) in the top right corner of Chrome to open the Task Manager.
- Navigate to ‘More tools’ and select ‘Task Manager.’
- Sort the processes by clicking on the ‘Network’ column.
- Identify any resource-intensive tasks.
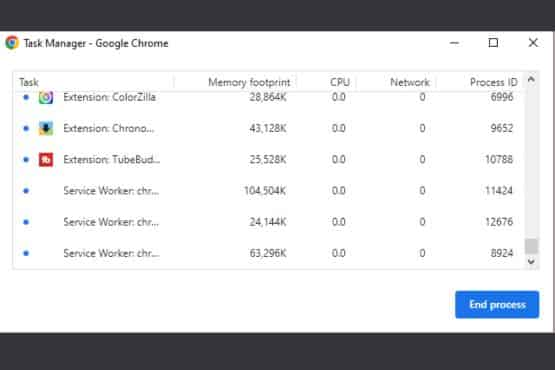
- End the process to free up resources and enhance your download speed.
Close Other Applications
Identify and close any bandwidth-intensive applications running on your computer to maximize your internet connection for faster Chrome downloads.
Launch Windows Task Manager, then navigate to the ‘Network’ tab to arrange the running programs in descending order of their network activity. Click the right mouse button on the offenders and choose “End Task.”
Additionally, use the Resource Monitor to find any other applications or services that are consuming network resources.
Lastly, pause downloads on other connected devices to optimize your Chrome download speeds. Doing this will free up valuable bandwidth, allowing your Chrome downloads to run at lightning speed.
Disable VPN
Disabling your VPN can potentially increase your internet speed. Here’s how to do it across various platforms:

- Windows: Launch the VPN software and click the same button used to enable it, selecting ‘Disable.’
- Mac: Click the VPN icon in the menu bar and select ‘Disconnect.’
- Android: Navigate to ‘Settings’ > ‘Network & internet’ > ‘VPN’ and toggle the VPN off.
- iOS: Go to ‘Settings’ > ‘General’ > ‘VPN’ and toggle the VPN off.
By disabling your VPN, you may observe a faster download speed on Chrome. However, not using a VPN can reduce your online security. If the VPN server is far from your location, it may slow your download speed.
Evaluate whether removing your VPN connection increases your download speed, balancing security and speed.
Update Chrome Version
Keeping your Chrome browser up to date ensures your downloads will be smoother and faster. To check if you need an update, click on the three vertical dots in the top-right corner of your Chrome window. Go to ‘Help’ from the dropdown menu and select ‘About Google Chrome.’
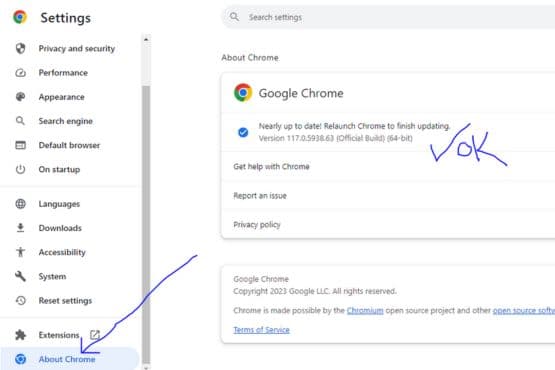
Under ‘Advanced settings,’ make sure the ‘With’ circle is selected and choose ‘Google (Public DNS)’ from the dropdown. After that, Chrome will automatically check for updates, download, and install them.
Fixing slow Chrome download speeds is as simple as updating your browser to the latest version. Doing so guarantees a better download experience, enabling you to quickly and efficiently download files.
Disconnect Other Devices
If you want to improve your Chrome download speed, one of the best things you can do is disconnect other devices from the same network. This will help reduce congestion and let your device run at maximum speed.
To do this, open the Chrome Task Manager from the Chrome Menu and select the devices you want to disconnect.
You can also enable parallel downloading, which splits the download into multiple chunks, which can also help improve your download speed. Finally, clearing your browsing data can also help speed up downloads.
Enable Parallel Downloading
Enabling Parallel Downloading can significantly increase your download speeds. This advanced feature in Chrome allows it to fetch a file in multiple parts simultaneously, reducing download times.
Launch Chrome and enter ‘chrome://flags‘ into the address bar to activate it. Search for ‘parallel downloading’ and select ‘Enabled’ from the dropdown menu. To implement the change, click the ‘Relaunch’ button.
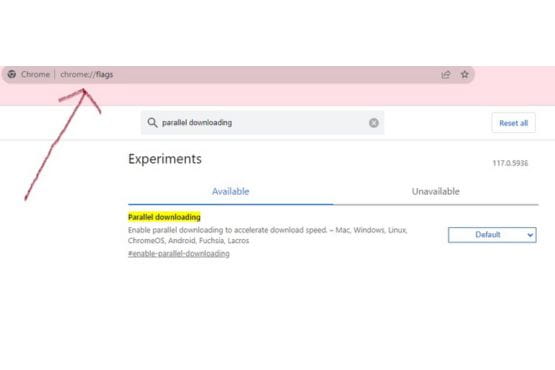
With this enabled, Chrome will break down files into multiple segments and download them concurrently, making your downloads faster.
Despite being in beta, this feature is still worth trying out for those wanting to improve their download speed on Chrome.
Clearing Browsing Data
Clearing your browsing data can give your download speeds a much-needed boost. To do it in Chrome, open the Chrome menu and select ‘More tools’ then ‘Clear browsing data.’
Specify the time range for which you want to clear your data, and ensure that all the options are checked. Finally, click ‘Clear data.’
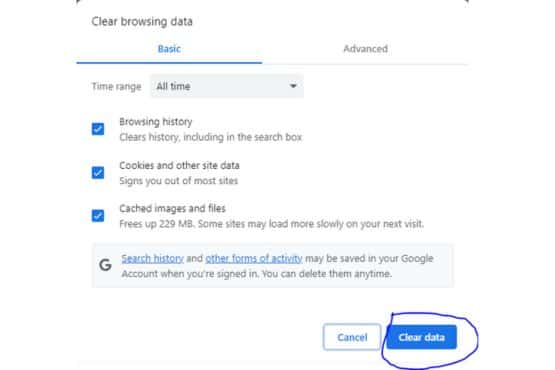
This will help decrease the load on Chrome, allowing it to better focus on downloading the content you need. Additionally, clearing temporary files and cookies will increase the amount of available resources, resulting in faster download speeds.
Flush DNS Cache
Flushing your DNS cache can help improve your internet connection and increase your download speed in Chrome. It eliminates outdated or corrupted DNS records that may impact your connection and browsing experience.
To flush the DNS cache in Chrome, navigate to ‘chrome://net-internals/dns’ and click the ‘Clear host cache’ button.
Windows users can open the Command Prompt application and type ‘ipconfig /flushdns’ to flush the DNS cache.
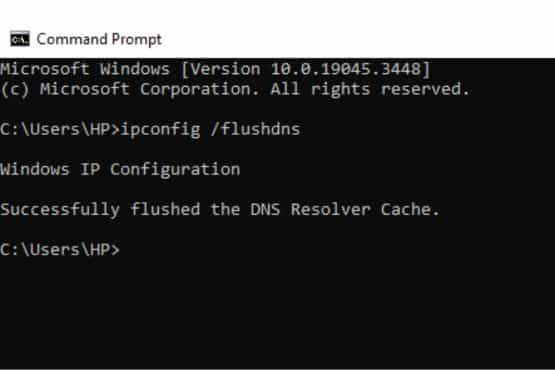
This process can make Chrome download faster and help fix slow Chrome download speeds. Still, it’s important to remember that it may not always resolve the issue. Other solutions should be explored if you continue to experience slow download speeds.
Update DNS Servers
You can significantly boost your internet speed by changing your DNS server to Google Public DNS. Here’s how you can do it in Chrome:
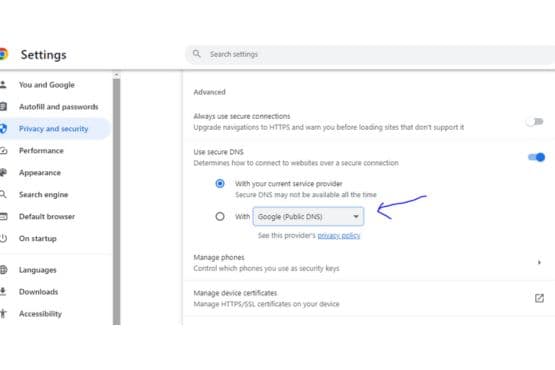
- Go to ‘Settings’ and select ‘Privacy and Security.’
- Then click Security
- Under ‘Advanced settings,’ set ‘Google (Public DNS).’
- For the best results, use the following Google Public DNS IPv4 addresses:
- DNS Server of Choice: 8.8.8.8
- Alternative DNS: 8.8.4.4
Alternatively, you can change your DNS server at the device level through your network settings.
Optimizing your DNS server can help with bandwidth and prevent malware from slowing down your internet service.
As an extra precaution, you should also clean up your task manager to get the best out of your Chrome download speeds.
Disable Third-Party Extensions
Turning off add-ons from other sources is an excellent place to start if you want to get the most out of Chrome. Chrome’s ‘More tools’ menu may be accessed by clicking the three dots in the browser’s upper-right corner and then selecting ‘Extensions.’
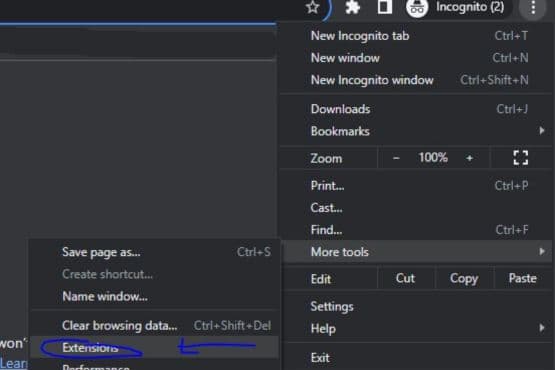
Here, you’ll see a list of installed extensions. Toggle off the extensions that aren’t essential, which can boost your download speed and make Chrome more efficient.
Be sure that Chrome is up to date, as this is the best way to optimize your download speeds.
Disable Hardware Acceleration
To optimize your browsing experience, disabling hardware acceleration in Chrome is a good idea. This feature uses your device’s graphics hardware to expedite processes. Still, it can lead to issues such as menus and dialog boxes not rendering correctly. Disabling hardware acceleration can rectify these problems and potentially boost your download speeds. Here’s how:
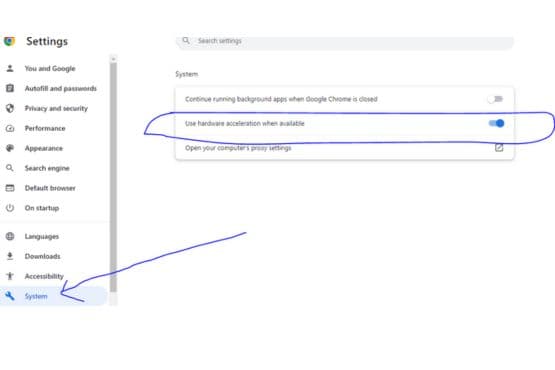
- Click on the three vertical dots in the upper-right corner of your Chrome browser.
- From the dropdown menu, go to ‘Settings.’
- Navigate to ‘Advanced’ and then ‘System.’
- Locate the option to “Use hardware acceleration when available” and disable it.
This will shift Chrome to software rendering instead of relying on hardware acceleration, resulting in faster download speeds. It can also prevent trying to download files from stalling or slowing your server.
Turning off hardware acceleration will help ensure that you experience fewer slow downloads on Google Chrome and that your speeds remain top-notch.
Setup a Download Manager
Installing a download manager can dramatically improve your download experience and accelerate speeds. It works similarly to Chrome’s parallel downloading, breaking large files into smaller parts, each fetched separately from the server. This reduces strain and allows the full bandwidth of multiple connections to be utilized.
It also offers the advantage of resuming interrupted downloads – something Chrome can’t do. Download managers are a great way to quickly and efficiently improve the download speed of Chrome (or another browser) when it’s slow.
Conclusion
If your Chrome downloads are running slow, don’t worry! With a few simple steps, you can quickly fix the issue. From checking your internet connection to disabling third-party extensions, these solutions will help you get back up to speed quickly. Some may worry it takes too much time or effort, but the process is straightforward. Plus, it’s worth the effort to enjoy faster downloads. So give it a try and see the difference!


